Translate

Sunday 13 December 2020

Fried Bee Hoon

 Hello all 

I haven’t written a post for quite long 

Recently I have been cooking and baking again and my family likes the fried beehoon 


Ingredients to use 


Bee Hoon 1 packet is 400 gm I used about 200gm 

2 eggs beaten with a tsp of light soy sauce and some white pepper.

1 small can button mushrooms - drain the water away and rinse and dry them 

About 2 inches of carrot peeled and cut into strips 

2 cloves of garlic peeled n sliced 

Cabbage sliced into strips

Light soy sauce 

Cooking oil for frying 

Non stick wok is good for stir fry 


Sauce for beehoon

For this recipe my tablespoon is the spoon we use to eat rice 

Oyster sauce 2 tablespoons 

Dark soy sauce 2 tablespoons 

Salt about 1/2 tsp

Sugar about 1.5 tsp

Put the sauce ingredients in a Chinese rice bowl n top up with water up to 4/5 height of bowl and mix well 

Taste can be adjusted after tasting beehoon 


Method 

1. Soak beehoon with tap water in a large plastic basin till soft around 15 mins then drain away water. 

2. While beehoon is soaking, prepare sliced garlic, carrots , wash button mushrooms , slice cabbage and beat eggs. 

3. Heat wok and add in cooking oil

4. Turn heat to medium and fry garlic and carrots for about 30 seconds and add in mushrooms . Drizzle light soy sauce in about 1 tsp . Fry another 20 seconds and add in cabbage . Fry till button mushrooms are slightly browned and cabbage softened. Remove from wok and set aside.

5. There should be some oil left in the wok . Use this oil to cook the eggs. Remove cooked eggs and shred roughly for use later. 

6. Remainder oil if not enough , add a little more and put in beehoon . I stir the beehoon around a little and add in the sauce. I used my long chopsticks and spatula also.

Immediately stir the beehoon round and try coating all the beehoon with sauce . At this stage observe if beehoon become too dry, add in a bit more oil. 

7. Taste the bee hoon. Adjust seasoning if necessary . 

8. Dish out into casserole and top with the fried ingredients 

9. My fried egg served separately .

10. Optional to serve with fried firm tofu and ketchup or chilli .


Please note my beehoon is on the drier side . You may add more water during cooking process if you want it wetter.

I saved some for lunch the next day and added some hot water to the beehoon and microwaved for 3 minutes .

Happy cooking !


Saturday 9 March 2019

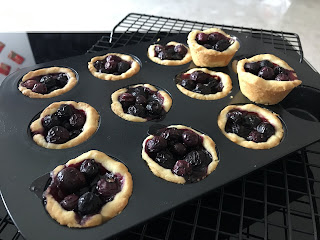
Mini Blueberry Tarts


Today is cell group day and I decided to try bake something for sharing 

The blueberries were on sale at the supermarket 
I bought new mini muffin trays too

I referred to Martha Stewart’s recipe for the blueberry filling as well as a recipe in Martha Day’s cookbook for the rich short crust pastry with a little adjustment 

If you wish to follow exactly here is the link 

For the rich shortcrust pastry 
225 gm plain flour
1/4 teaspoon salt
170 gm unsalted butter cubed n chilled
1 egg yolk and 1 tablespoon iced water was used to bind
I used 3 tablespoon icing sugar instead of 1 tablespoon caster sugar

Sift the flour, salt , sugar into a medium size bowl
Add in the cut chilled butter 
Rub with flour to achieve a crumb like texture. I didn’t quite achieve it though
Then add in the egg yolk n one tablespoon of iced water
Then use a fork to mix in n form a ball
Wrap in cling wrap n chill in the fridge for 30 mins

For the blueberry filling 
2 punnets of blueberries or 2 cups
1/4 cup of caster sugar - I added 1 more teaspoon 
Grated lemon rind from one lemon 
Lemon juice 1 tablespoon 
Cornstarch 1 table spoon

Mix everything together in a medium bowl 

Assembly 
I used about 17 -18 gm for dough for each piece 
Use half of the pastry dough n keep the other half in the fridge 
Make a round ball n press down in your palm into a circle large enough 
To fill the muffin hole 
Fill all the muffin holes then spoon in the blueberry filling 
Do not pile up too much because the blueberry juice will burst 
may stick to the pan n cause the tart to stick to the pan 
And it will be hard to remove 

After filling I kept the tray in the fridge for about 10 mins

Heat the oven to 190 degree celcius

Bake for about 20 minutes or till the crust turn brown 
and the blueberries filling bubbles
 Remove to rack to cool and let the tarts sit in the tray for 2-3 minutes
Gently use the tip of a small knife to help remove the tarts

I made 24 mini tarts 


Thursday 23 March 2017

One pot rice

Sometimes on weekends, is my time to cook day. A lot of times, my hubby will not want me to cook and he prefers to buy from the food centre but he does appreciate if my food is good. But I do hate washing up!


Last weekend, I searched for one pot rice and chanced upon this recipe for "Kiam Peng" meaning salty rice.


The ingredients are simple, I used about 250 gm of chicken thigh meat, diced and pan fried first.


Then fried the garlic, and ginger and diced onion together.
Added in the carrots, some shimeji mushrooms and long beans.
After frying those, I added sliced cabbage, about 1/4 of  a large cabbage.
Then I added in Kikkoman soy sauce, Tai Wah dark soy sauce and oyster sauce, some sesame oil  and fried together.


Note : no need to cut the beans and carrots so fine, because in the end, I couldn't see my vegs!!


After frying, mix into the rice which you place in the rice cooker. I mixed water with chicken stock.
I followed and put less than the water level for 2 cups rice. Mix well and cook.


mixed in
almost cooked


After cooking, mixed well, and I put in some Chinese parsley. Let it sit for 15 mins before serving.


The rice is fragrant and tasty! but you should not skimp on the ingredients - should put in more than what I did.
Happy cooking everyone!


Tuesday 21 March 2017

Hi Everyone,
It's really been so long since I last updated this blog.
for sometime, I could not access this blog and I have been using my phone to post.
Today I have tried to use the computer instead.


I have been busy taking a course for work and didn't really do anything much except mugging and catching up on sleep since I took night classes.


After the course ended, I pampered myself taking up some cooking lessons and finally decided to sign up a bread making course.


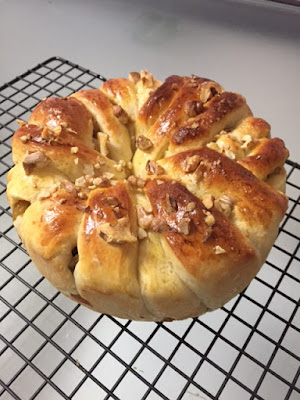
The photos below are the marron glace crown which I made in class. We used Japanese chestnut. On its own, it is very sweet, but combined in bread, is very appealing.


I made again the next day replacing the chestnuts with golden raisin and walnuts. I also scattered some walnuts on the bread before baking. It turned out quite well and is also tasty. I ate the bread over 3 days for breakfast.


Bread is made using handknead method. I will be posting more bread posts in future.
Happy mid week to everyone!!


Monday 12 September 2016

Creamy lemon berry cheesecake

This recipe comes from the box of Philadelphia cream cheese 

This is how mine turned out
I changed the base to Oreo and used only 3/4 punnet of blueberries in the cake 
I also did a raspberry sauce to decorate the top


Recipe
Ingredients 
The cake
2 x 250gm cream cheese softened about 30 mins 
3/4 cup caster sugar
1 lemon - grate the zest n get the juice
1 cup of heavy cream
3 teaspoons of gelatin dissolved in 1/4 cup of boiling water 
1 punnet of blueberries 
I omitted the strawberries 

Firstly prepare the base 
The base 
15 Oreo cookies with filling crushed to fine bits 
80 gram melted unsalted butter
Mix them together and press into the base of the 20cm spring form tin
The type with a removable base
Chill in the fridge 

Place the softened cream cheese and sugar in a large mixing bowl n beat together till combined
Then beat in the gelatine mixture till just combined
Add the cream and lemon juice and beat till combined
Fold in the lemon zest and blueberries 
Pour into prepared tin and chill

Prepare the raspberry sauce - recipe from this link 


Decorate the cake with rice crisp milk chocolate I bought from baking shop Phoon Huat 


You can buy the happy birthday signs from SKP the store that sells a lot of plastic wares.

We enjoyed the cake however maybe I will recommend to remove the Oreo cream next round as the base looked a bit greasy 

The cake ,raspberry sauce n the chocolate 


Friday 26 August 2016

Banana Cake

My friend Helga posted this recipe she adapted from a cookbook to Facebook and I decided to try but I found I didn't have self raising flour so it checked for a recipe to make it.

Here is the recipe for the banana cake


To make self raising flour
1 cup plain flour
1/4 tsp fine salt 
1 tsp baking powder
Mixed together 

Other ingredients
250 gm ripe bananas ( about 2.5 bananas)
3 eggs 
40 gm melted unsalted butter
1 tsp baking soda
100 gm brown sugar
1/2 tsp vanilla

Cut the bananas into smaller slices into a medium bowl and mix with the baking soda and set aside.

In another medium bowl, mix 3 eggs with the brown sugar and 1/2 tsp vanilla till the sugar is dissolved. 

Add the prepared flour into the eggs mixture n mix thoroughly till no more white flour can be seen 

Then add the egg mix into the bananas 

Stir well and then add in the melted butter. Combine. 

Preheat oven to 180c.

I lined my loaf pan with baking paper with paper hanging over the sides of the loaf pan and pour the batter into it. This helps to remove the cake easily.
Place a few slices of bananas on the surface.
Bake for 35-40 mins.
Cool before cutting.

Before removal from pan 

11 slices ( I ate a piece)

Happy Baking!!

Sunday 7 August 2016

Roti Boy Buns


I can still remember buying roti boy buns in Malaysia and they were very popular many years back.

Today I happen to come across this YouTube video on how to make them


I was already making bread buns so I used about 300 gm of my dough to make 6 of these roti boy buns.

Wrap a pc of cold butter I use 4-5 gm wrap in a small pc of dough 10 gm


Further wrap into the main bun dough 

Before proofing

After proofing about 30 mins

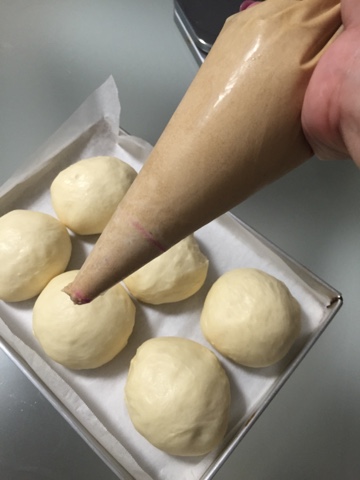
Make the coffee paste n chill it in a piping bag

Ready to pipe ( sorry my nozzle hidden) actually can don't use nozzle 

Pipe rounds about halfway on the bun

Baked at 180 for about 15 mins

I used bread flour - see the butter in the middle?

Light coffee flavour

Do give it a try! Happy baking